Thursday, 27 May 2010

Fun shooting MotoX

My new found "hobby"of motor sport photography recently took me to Canada Heights in Kent. The event was the round 3 of Motocross Federation Red Bull Pro National tour which meant lots racers of various ages and abilities competing almost constantly for the best part of 5 hours.

Never having been to a motocross event before I my research and realised this was no ordinary motorsport event. The biggest difference for photographers was how close you could get to the riders compared to normal motorsport events. I don’t just mean in the pits, I mean the actual race itself.
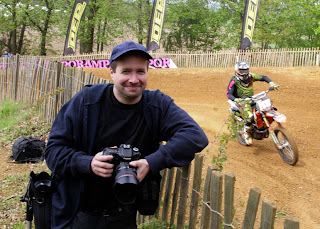
This photo of me should give you an idea of exactly how close to the track we really were. Incidentally this photo was taken by my good friend and awesome sports shooter Jonathan Munro. You can check out some of his shots from the day on his Flickr page.

Although I applied for media credentials (I was hoping to shoot some photos and video for Digital Photo Magazine) the organisers weren’t forth coming, which made me a bit disappointed at the time. But the moment we got to the track I realised that I didn’t need a press pass to get unbelievably close to the racers.

We were so close to the action that we were regularly hit by the dirt thrown up by the bikes. The hat wan't a fashion statement but an essential item of clothing unless you want to spend the day picking mud out of your hair. It goes without saying that there is a very real risk to you’re your camera gear as well as your person.

I started the day using a Sigma 50-500mm lens I borrowed from Jonathan. It’s a monster long lens when wound right out to its full 500mm. The images looked excellent, but as we moved round the track we found ourselves getting closer and closer to the bikes and that long lens spent most of the day in my kit bag.
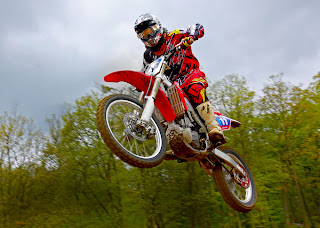
Swapping to my favourite lens, the Canon 24-105L, proved to be a good decision. It’s a super sharp lens with swift focusing which was perfect for shooting the bikes that were whizzing past just a few meters or so in front of me. I also did something I’ve not done in a while… I spent the whole day shooting JPEG images.

OK, I know I bang on and on about shooting in RAW and I’ve not changed my opinion on the subject, but when it comes to shooting sports the shear volume of images I shot made shooting RAW an impossibility.

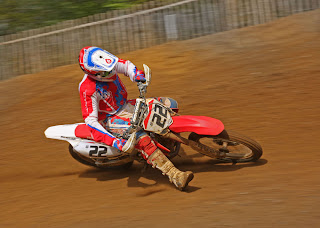
Some of my favourite images of the day were the panning shots. I really wanted to get this technique mastered and after a few hours practice I pretty much had it sorted so here’s how I did it.
Practice the shot
I spent a couple of minutes watching the bikes go past and noting which line they took round a bend or along a straight. Next I’d practise the panning (without taking the shots) so I could be sure I had the zoom wide enough to capture the action all the way past me.

Background
As with most events there were plenty of advertising banners, spectators and marshals to distract from your photos so picking a good spot was vital.

Camera settings
I shot in Shutter Priority and settled on a speed of 1/125th of a second, which was slow enough to blur the background but fast enough to keep the biker sharp. I also used the cameras focus tracking and a single centre focus point to which I tried to keep locked on to the bikers helmet.

The reality
So how did I do? Well I shot around 3000 images (I couldn’t believe it when I got home) of which the vast majority are only good for the bin. I knew that would happen and I’m not worried, because when the photos worked they look fantastic.

I’ll defiantly be going back to Canada Heights again and who knows, next time I might even be able to work out who’s winning the races!

Race For Life - The Results

You may recall I had a blog post about my wife and daughter running the Race For Life. The response far exceeded our expectations as many of you were kind enough to sponsor us. All the funds are going to Cancer Research.

Well the race for life was last night and I’m happy to report that Sam & Freya completed the 5 kilometer run in a fraction over 30 minutes and raised £325 pounds in the process.

Once again a big thank you to everyone who sent messages of support and filled out the online sponsor form.

So, why wasn’t I running? Two reasons. One, Race for life is for women only and two, someone’s got to take the photo’s ;-)

Wednesday, 26 May 2010

Photo beach teach - New DVD

It’s been a while since I’ve released a new DVD so I’m very happy to announce that the newest Gavtrain DVD is finally available.

Follow this link for full details. You;ll be able to watch three sample videos from the DVD and better still I'd be very pleased if you buy a copy.

This DVD is a very slight departure from my previous offerings. Yes there’s still plenty of Photoshop tutorials of course but there’s also three live action photography videos. Two of the videos you may have seen short version of before. They are the long exposure technique and the beach 15 minute challenge, but there’s also a brand new unseen video where you’ll discover a secret passion of mine, stacking stones.

I’m constantly asked how I make my images look the way they do, well watch the DVD tutorials and you’ll find out.

As always I go to great lengths to ensure the DVD is compatible with both Windows and MAC computers and with every version of Photoshop from CS3 onwards. I even have two versions of one tutorial so CS3 and CS4 users both get a complete insight into how I work.

Free prize draw

Anyone who buys the Photo Beach Teach DVD before 30th June 2010 will be entered into a prize draw to win a limited edition, signed copy of my favourite picture from the DVD. There are three prints up for grabs and the only way to get one is by being in the prize draw.


Don't worry if you've already bought a copy of Photo Beach Teach, you've already been entered. Good Luck.

Tuesday, 25 May 2010

Exposure compensation - video & tips

This Quick Shot question comes from Gary S who asks:

“…I don't really understand what the Exposure Compensation is and when it should be used. I remember seeing you use it by 1 stop I think it was to prevent a white back drop looking grey”

Scroll down for some exposure compensation FAQ's

A few questions that have already arisen:

Where’s Exposure Compensation on my camera?
I might be called EV +/- check your manual.

Can I use Exposure Compensation in Manual mode?
No, exposure composition may is usually only available in Aperture Priority, Shutter Priority and Program modes.

Isn’t the camera meter always correct?
Modern cameras feature intelligent meters which produce good images every single time… almost. Good as they are they still make mistakes, which is why checking your cameras LCD and histogram from time to time is a good idea.

My Canon DSLR’s exposure compensation doesn’t seem to work.
Make sure you have the on button switched to the angled line symbol.

But I was told real photographers only ever use Manual mode, everything else was for amateurs.
Total rubbish. Most photographers I know generally use Aperture Priority when shooting in natural light.

Can Exposure Compensation be used in other ways?
Yes it can. By deliberately inducing under or over exposure you can add mood to an image. Dark images add drama where light images feel calming.

I thought Camera RAW could pull back two stops, so why do it in the camera.
In fact Adobe Camera RAW can pull 4 stops each way and that can be a life saver at times. But be careful not to fall into the mind set of thinking “I’ll fix it in Photoshop”, it’s a very slippery slope. Try and think I’ll get it right in camera and you’ll be a better, happier photographer.

Monday, 17 May 2010

Save time with a Grad. Filter

Last week I took delivery of my latest piece of equipment. It’s not a fancy new camera body, fast lens or even the latest version of Photoshop (although all of those are on my wish list). Never the less I do expect the new equipment will save me time and improve my photography.

So what’s this amazing, must have gizmo? Nothing more then a good old fashioned Grey Grad filter.

It often surprises people to discover that I still use filters on my camera. That’s probably because I enjoy using the powerful features that Photoshop offers. But despite the advantages Photoshop gives me, I still try to capture the best image possible in camera.

I’ve been using an old square Cokin grey grad filter for years, but as the quality of lenses I use has gone up, I’ve out grown the Cokin filter. I really have literally out grown it because it’s only just covers the front of my lenses. So my replacement is a large 100mmx125mm filter from Kood.

I’m pretty sure there are many newer photographers out there who have never used a grey grad filter. So here’s a quick Q&A session to explain what it does.

When do you use a grey grad?
Whenever you’re shooting landscapes and the sky is the brightest part of the image.

But isn’t that’s always the case?
Pretty much, yes.

How do I use it?
You place the filter in front of the lens and move it until the grey part covers the sky.

Do I need a special filter holder?
You can buy a filter holder, just make sure it matches the size of filter you bought. However I use a rapid attachment device, better known as my hand.

Why don’t you just take multiple images and do a bit of HDR?
I do, but if the grey grad is in my bag and it does the job, it saves a huge amount to time.

I’m happy doing the multiple photo method, do I still need a grey grad filter?
Not if you don’t want to.

OK, I’m interested, can I see and example.
Here you go. Here’s one I made recently.


OK I’m sold, where can I get one and how much does it cost?
I bought a Kood two stop ND Grey, cost around £20 from: http://www.crookedimaging.co.uk/product_info.php?products_id=384

If moneys no object, you can buy the "pro" version by Lee filters for around £60 from here: http://www.warehouseexpress.com/buy-lee-neutral-density-0-6-soft-graduated-resin-filter/p1010470

Of course there are plenty of other suppliers for both filter types.

So there you go. If you’re wondering how the final image turned out have a look at the image below.

Tuesday, 11 May 2010

Shooting banger racing

Last weekend the family and I all went to the local Banger race meeting. There are other similar meetings all over the UK but this one was the Smallfield Raceway in Surrey, which is only a few miles from my home. Despite my close proximity to the meeting I’ve never been before and although I was pretty sure it would make for some good photos I really didn’t know what to expect.

In the end I had a great day. Banger racing is full of thrills and spills and I bagged a couple of really great shots, but I also came home with some really poor ones. I learned a couple of useful things during the day, which my help you in the future.

Camera Gear.
I’d heard the banger track we were going to would be a dust bowl, so I opted to pack my older gear. I used my Canon 40D for the body and an old Canon 70-300 zoom lens. The 40D body was the perfect choice with it’s APS-C sensor increasing the effective zoom to over 450mm. Best of all it has an awesome continuous shooting mode of 8 frames per second.

Problems
The weather is always a problem in the UK, or rather we like to think it is. It’s either too bright, too cold or too wet. Well, this day was too dark. Think big brooding skies, perfect for landscapes shots but not so good for action shots where a fast shutter speed is required.

But the biggest problem, by a mile was the fence. You can see the problem in the image on the right and this was one of the better ones.

As soon as I saw the fence I knew it would be a problem. It was a tall, black, heavy mesh fence which was great for catching flying tyres, but terrible for photography.

Camera settings
I set the camera to continuous shooting 8fps which could knock out 6 RAW images before pausing for breath. I shifted the ISO between 400 – 800 as I tried to keep the shutter speed around 1/1000th second for maximum sharpness.

Focusing was a total nightmare. Servo focus mode is essential so the camera can track a moving object and keep it sharp. Unfortunately the constant focus was the cause of a major head ache. One second I could see a sharp car in the viewfinder, then it would vanish when the camera suddenly focused on the fence. By the time The focus was back on the car I'd have missed the action. This happened again and again and again...

To minimize the appearance of the mesh fence I shoot with a wide open aperture and zoom in as much as possible. I managed to find a spot where I could get a little closer to the fence (about 2 metres) but it still appeared in many of the photos

Useful lessons.
1 Getting on a corner where the cars were coming towards me worked really well.

2 The old 70-300mm lens wasn’t a good choice. Yes the long zoom was good, but the focusing was painfully slow and the f5.6 max aperture gave me problems with shutter speed and fence issues.

3 Take a step ladder. Not being the tallest person in the world I had trouble getting a good view point. I should have packed the steps.
4 Shoot loads and loads of photos. Practice makes perfect and the later images were easily the best. You’ll also need plenty of spare memory and spare batteries.

5 Go to the pits. This isn’t Formula 1, so it’s perfectly OK to wonder round the pits and capture the action. Angle grinders, greasy mechanics and bent metal make for some interesting shots.

6 Share your work. Banger racing is pure amateur fun, so if you get some great shots send them to the race organisers and sponsors.

7 Cheap lenses will do the job, but it's so much easier to use good quality lenses.

8 Banger racing is a great day out, even without the photography angle. They award a prize for "The best roll over of the day" which says it all really!

Sunday, 9 May 2010

Race for life - Help needed

I know this is a photography blog, but there are a few things more important then taking photos.

Race for life is a 5 kilometre fun run organised by Cancer Research UK it's the largest women-only fundraising event in the UK. Now you've probably spotted I’m not a female, but I know two people who are.

On the 26th May Sam & Freya (my wife & daughter) will be running the race for life in Crawley and are looking to raise as much money for Cancer Research as possible and that’s where you come in.

So if you’ve enjoyed watching my videos and can’t believe they’re still free, I’d be most greteful if you could make a charity donation by following this link.

http://www.raceforlifesponsorme.org/samhoey1

Thanks for your support, normal photography blogging will return very soon.

Friday, 7 May 2010

Beach - 15 Minute Photo Challenge

Firstly, a huge thank you to everyone who’s helped kick the new Gavtrain Facebook page off to a flying start. I know a lot of you have already become fans which is fantastic.

OK, on to today’s blog post. I get a regular stream of emails asking for me to do more 15 minute challenges so after a winters break I’m very pleased to be able to post the first 15 minute challenge of the year.


If you want to have a better look at see some of the check out my Flickr photostream or follow the links below to see the individual photos.

http://www.flickr.com/photos/photogavin/4574957716/sizes/o/
http://www.flickr.com/photos/photogavin/4574326343/sizes/o/
http://www.flickr.com/photos/photogavin/4574959432/sizes/o/
http://www.flickr.com/photos/photogavin/4574324635/sizes/o/
http://www.flickr.com/photos/photogavin/4574325197/sizes/o/
http://www.flickr.com/photos/photogavin/4574325523/sizes/o/

Tuesday, 4 May 2010

Quick Shot Answers

OK, it's time for some more answers to a selection of the hundreds of Quick Shot questions you've sent me. Sadly I can't answer every question I've been sent, so if I missed your question out please don't take it personally.

Name: Kristian L (from Hungary)
Question:: Hi Gavin Hoey! My question is, i have cs4 but i can't find the Extract buton under Filter!!! In old Photoshop i've got it! What can i do?
Answer: Extract is still on the CS4 installation DVD but doesn't install as standard. However if you'd rather not go hunting through the Photoshop DVD John Nack (one of Photoshop's lead product developers) posted links to download the missing tools on his blog. Here's the link. http://blogs.adobe.com/jnack/2008/10/where_did_extra.html

Name:: Putu A
Question:: Hello Mr. Gavin. My question what is the difference of lens diameters ie.. 58mm for 18-55mm or 67mm or 72mm. Thank you
Answer: Different lenses have different diameters, don’t get to hung up about it. If you use filters with your lenses always buy filters that will fit the largest diameter lens you own. Step up adaptors can be used to attach the big filter to the smaller diameter lenses.

Name:: Monica C.
Question:: Hi! I take lots of pictures during my daughter's soccer game ... (outdoors).. And most of my pictures do come blurry! I do set up my camera in "action mode" and my ISO in "auto".. Any suggestions on how can I improve my pictures?? (I don't use flash at all)
Answer: Blurred images can be caused by either camera blur (everything blurs) or motion blur (subject blurs) To help avoid both work in Shutter Priority mode (Tv on Canon) with a speed of 1/1000th second or as high as you can go. Increase the ISO so you can hit that shutter speed.

Name:: Tony J
Question:: Hi Gavin, Just watched you tutorial on beach/sea shots. Would it not be easier to alter your shutter speed manually to say 5" delay & get the results you needed that way? maybe iso 100, f22, 5" Thank, Tony
Answer: Tony you were one of many people who said the same thing. The answer is simple. THAT WILL NOT WORK.
Sorry to shout but think about it for a second. Shutter speed, aperture and ISO are all linked. Change any one of the settings and at least one of the other settings would also need alter to compensate. Dialling in a longer shutter speed would allow more light into the camera so to compensate I’d need to either make the aperture smaller (f22 was the smallest) of lower the ISO (100 was the lowest).
If you missed the video you can view it here

Name:: Tim A
Question:: Your Question Here: When I set the white balance manual using a white paper after it set can I use flash on my shot will the setting be wrong? Tim A Kentucky 41824
Answer: The white balance applies to the lighting you used when it was ser. So if you lit the paper with your flash you’ll be OK with the flash gun, but if it was lit by room lights the white balance will be wrong for flash. Best answer is to use RAW and adjust the white balance if it looks wrong.

Name:: Chris P
Question:: Hi I have watched your videos and tips on photoshop and found them graet now I have got proshow producer 4 and wanted to know wheres are the best to learn how to use
Answer: Check out the amazingly kind people over at the Proshow enthusiasts forum. http://www.proshowenthusiasts.com/

Monday, 3 May 2010

Gavtrain now on Facebook

Many of you have asked if I have a Facebook account and up till now the answer has been no. Well I’ve very pleased to announce that now the answer is YES! OK it’s not a big thing for many people but as someone who is pretty much clueless when it comes to Facebook it’s a leap into the unknown.

Fortunately my wife Sam is rapidly becoming an expert in all things Facebook as she has volunteered to take on the role of Facebook administrator for the Gavtrain page.

So far the results look good. Click the screen shot to have a look (or click this link). You don’t need a Facebook account to view the page, but you do if you wish to and comments and become a fan.

To kick things off Sam’s added a brand new 15 minute challenge video to the Facebook page. It was recorded at the beach a few weeks back and the challenge was to find great photos in a very small location. It was great fun to do and the results look pretty good.

The same video will appear right here on the blog on Friday, but until then it’s only on the Facebook page.