Monday, 14 June 2010

What's missing from your DSLR?

Today’s digital SLR cameras are amazingly clever things, but turn the clock back 25 years or so and you’d find me using a Praktica MTL-5B. It’s feature list was pretty slim. Things like aperture priority, TTL flash and even a motor drive we’re luxuries I could only dream about.

A few years later I blew all of my first pay cheque on a Minolta 7000i, one of the most advanced cameras of it’s day. Now I had everything that was missing on the Pentax. The Minolta even had an auto focus that actually worked… as long as you weren’t in a hurry.

By today’s standards both the Praktica and the Minolta are technological dinosaurs, but despite all our new fancy “digital” technology there’s one thing our DSLR’s are no better at then my old Pentax. Can you guess what it is?

OK, I’ll put you out of you misery. The answer is YOU, or in my case me.

No amount of digital wizardry has yet solved the problem that only you can decide what will make a great shot and what won’t. You need to train you eyes to see photographs and the only way to do that is to get out there and take to photos.


Have a look at these three images. They were all taken last weekend on a family walk along the Bluebell Railway in Sussex. All three images were taken from exactly the same spot. In other words I didn’t have to move my feet to take the images, I just had to look for them. Of course Photoshop, or in this case Lightroom, played it's part, but far less then you might imaginge.

Great pictures are all around you. The hard part is point the camera at them.

Tuesday, 8 June 2010

Quick guide to reading a histogram

The chances are you already know what a histogram is or at least where you’re likely to encounter one, but do you really understand what it means and how it can help your photography?

Where do I find the histogram?
In Photoshop the histogram will appear in a couple of places but most of us will be more familiar with the histogram that appears when we press CTRL+L and open Levels.
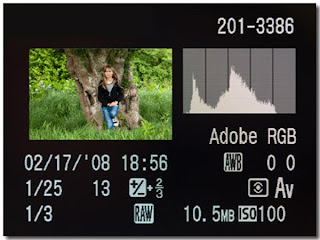
The chances are your camera will also offer a histogram view of your images and it’s that we’re going to be focusing on in this article. How you access the histogram on your camera will vary depending on the make and model, so if you don’t know how to find it on your camera go back and read your cameras manual.

So why should you be interested in the histogram? Because your camera’s LCD tells you lies, that’s why.

Who hasn’t looked at their images on the back of the camera and believed their images look great only to get home and discover the horrible truth… Your images are poorly exposed.

Remember, use your cameras LCD to check a photos composition, use the cameras Histogram to check exposure.

What is a Histogram?
In its simplest form a histogram is a graph which shows brightness across your image. The left side of the graph represents the dark tones, the centre shows the mid tones and the right is the light tones.

Lets start with a nice snapshot of a general scene, it’s got a big blue sky and nice green grass. In an ideal world a correctly exposed photograph will have a histogram with a fairly smooth curve which touches both edges and peaks towards the centre. That would indicate the image has a full range of tones and good contrast.
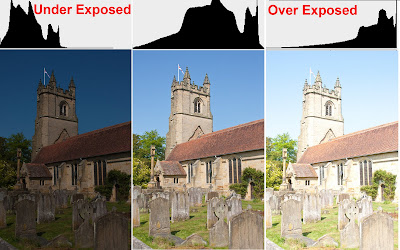
A histogram which is weighted more to the left would usually indicate an underexposed image, where as a histogram weighted to the right usually indicates an overexposed image. If you see either of these you need to think about altering the cameras exposure compensation.

The histogram trap.
Once you’ve mastered the basic skills in reading a histogram, you’ll be able to check your images on the cameras LCD and be pretty confident you have captured a good image before moving on. But a little knowledge can be a dangerous thing and in photography that means you’ll need to understand what your photographing before deciding that the histogram is telling you that the exposure is incorrect.
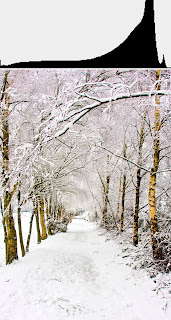
Take this image. There is a large amount of light tones in the image, which needs to be considered when looking at the histogram. A correct exposure would have the histogram graph pushed towards the right hand side. If the graph was a neatly centred histogram (like our first image) we would actually have an under exposed image.

Don’t fall into the trap of believing that because the histogram is pushed to the right side it automatically means that your exposure is wrong. It just means there’s a lot lighter tones in the image. You have to read the image as well as the histogram.
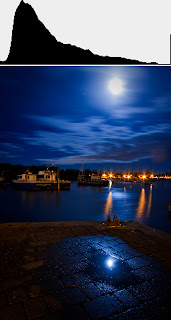


Conversely this is a very dark image so the histogram is pushed to the left. Once again it’s correctly exposed.

Understanding your histogram will allow you to capture better images and spend less time adjusting them in Photoshop and that’s got to be a good thing.

Friday, 4 June 2010

Selective colour in Photoshop - Quick Shot 07

Name:: Jessay, Winnipeg, Canada
Question:: Hi Gavin, Can you explain how to make a color splash in the photoshop.In a Big frame only one person in color and the rest in B&W.

Colour popping, selective colour, colour splashing... Many names but one technique which never seems to go out of fashion.

I expecting a few comments along the lines of "That's so easy... or, show us something more complex..." and so on, but before you post a comment just remember there was a time when even YOU didn't know this technique.

By the way, this video is also available in HD which is great if you watch the video in full screen mode. Have a look and tell me what you think.

Wednesday, 2 June 2010

More quick shot answers

Name:: Andrey
Question:: Hi, Gavin. Why I do not see "snapshot" icon next to "presets" icon? Camera raw 5.0
ANSWER: You don’t say what software you’re using, but if it’s Photoshop Elements then Presets and Snapshots are not available.


Name:: Alan Turrell
Question:: I am due to take some pictures at a comfirmation of a friend of mine, with permission. I have a Nikon D5000 + 18-55 kit lens and will not be able to use a tripod, so shooting hand held. It is a fairly bright church so not sure what settings to use
ANSWER: Three things to do. First set your camera to Aperture priority and choose the smallest number you can get. That’s likely to be f3.5 or f5.6. Second set the ISO as high as possible, which is likely to be 1600iso. Third shoot in RAW (or Jpeg & RAW) to give you maximum options in Photoshop.

Name:: michael leighton
Question:: Ahoey there...seeing as the sun is out(some of the time)whats the best way to take photos of a subject and getting sun flare in the shot i either get the subject too bright or too dark...cheers
ANSWER: That’s asking a lot of your camera meter, but two ways spring to mind. First involves taking several images using exposure bracketing to ensure you have one correct. The second, and my prefered method of working, is to exposure for the background and use a burst of flash to fill the shadows, just like I did in this photo.

Name:: Patrick
Question:: Hi Gav, I'd like to know how to use an UV-Filter effectively, particular in which conditions?
ANSWER: On our modern, expensive lens the UV filter is really there to protect the front lens from dirt and scratches. Mine never comes off my lenses.


Name::
David Fromming
Question:: I was wondering if you have any advice for building a wooden shed/studio in my back garden. My garage is too small and full of junk!
ANSWER: My office/studio is a very comfortable log cabin from Scandinavian log cabins Direct. As you'll see in the construction photo it's not a graden shed.Scandinavian log cabins direct were brilliant, even allowing me to design a photography friendly version of their Talbo design.


Name:: Erin K
Question:: Could you please explain how to calculate the correct settings for your flash/strobe when using off camera flash techniques?
ANSWER: A flash meter would solve your problems in a stroke. If you don’t have one set your shutter speed to the flash sync speed or just below (Use 1/125th if you don’t know what the sync speed is) and set the aperture to f8. Take a test shot and check the histogram. To dark? Try f5.6. It’s called trial & error.

Thursday, 27 May 2010

Fun shooting MotoX

My new found "hobby"of motor sport photography recently took me to Canada Heights in Kent. The event was the round 3 of Motocross Federation Red Bull Pro National tour which meant lots racers of various ages and abilities competing almost constantly for the best part of 5 hours.

Never having been to a motocross event before I my research and realised this was no ordinary motorsport event. The biggest difference for photographers was how close you could get to the riders compared to normal motorsport events. I don’t just mean in the pits, I mean the actual race itself.

This photo of me should give you an idea of exactly how close to the track we really were. Incidentally this photo was taken by my good friend and awesome sports shooter Jonathan Munro. You can check out some of his shots from the day on his Flickr page.

Although I applied for media credentials (I was hoping to shoot some photos and video for Digital Photo Magazine) the organisers weren’t forth coming, which made me a bit disappointed at the time. But the moment we got to the track I realised that I didn’t need a press pass to get unbelievably close to the racers.

We were so close to the action that we were regularly hit by the dirt thrown up by the bikes. The hat wan't a fashion statement but an essential item of clothing unless you want to spend the day picking mud out of your hair. It goes without saying that there is a very real risk to you’re your camera gear as well as your person.

I started the day using a Sigma 50-500mm lens I borrowed from Jonathan. It’s a monster long lens when wound right out to its full 500mm. The images looked excellent, but as we moved round the track we found ourselves getting closer and closer to the bikes and that long lens spent most of the day in my kit bag.

Swapping to my favourite lens, the Canon 24-105L, proved to be a good decision. It’s a super sharp lens with swift focusing which was perfect for shooting the bikes that were whizzing past just a few meters or so in front of me. I also did something I’ve not done in a while… I spent the whole day shooting JPEG images.

OK, I know I bang on and on about shooting in RAW and I’ve not changed my opinion on the subject, but when it comes to shooting sports the shear volume of images I shot made shooting RAW an impossibility.

Some of my favourite images of the day were the panning shots. I really wanted to get this technique mastered and after a few hours practice I pretty much had it sorted so here’s how I did it.

Practice the shot
I spent a couple of minutes watching the bikes go past and noting which line they took round a bend or along a straight. Next I’d practise the panning (without taking the shots) so I could be sure I had the zoom wide enough to capture the action all the way past me.

Background
As with most events there were plenty of advertising banners, spectators and marshals to distract from your photos so picking a good spot was vital.

Camera settings
I shot in Shutter Priority and settled on a speed of 1/125th of a second, which was slow enough to blur the background but fast enough to keep the biker sharp. I also used the cameras focus tracking and a single centre focus point to which I tried to keep locked on to the bikers helmet.

The reality
So how did I do? Well I shot around 3000 images (I couldn’t believe it when I got home) of which the vast majority are only good for the bin. I knew that would happen and I’m not worried, because when the photos worked they look fantastic.

I’ll defiantly be going back to Canada Heights again and who knows, next time I might even be able to work out who’s winning the races!

Race For Life - The Results

You may recall I had a blog post about my wife and daughter running the Race For Life. The response far exceeded our expectations as many of you were kind enough to sponsor us. All the funds are going to Cancer Research.

Well the race for life was last night and I’m happy to report that Sam & Freya completed the 5 kilometer run in a fraction over 30 minutes and raised £325 pounds in the process.

Once again a big thank you to everyone who sent messages of support and filled out the online sponsor form.

So, why wasn’t I running? Two reasons. One, Race for life is for women only and two, someone’s got to take the photo’s ;-)

Wednesday, 26 May 2010

Photo beach teach - New DVD

It’s been a while since I’ve released a new DVD so I’m very happy to announce that the newest Gavtrain DVD is finally available.

Follow this link for full details. You;ll be able to watch three sample videos from the DVD and better still I'd be very pleased if you buy a copy.

This DVD is a very slight departure from my previous offerings. Yes there’s still plenty of Photoshop tutorials of course but there’s also three live action photography videos. Two of the videos you may have seen short version of before. They are the long exposure technique and the beach 15 minute challenge, but there’s also a brand new unseen video where you’ll discover a secret passion of mine, stacking stones.

I’m constantly asked how I make my images look the way they do, well watch the DVD tutorials and you’ll find out.

As always I go to great lengths to ensure the DVD is compatible with both Windows and MAC computers and with every version of Photoshop from CS3 onwards. I even have two versions of one tutorial so CS3 and CS4 users both get a complete insight into how I work.

Free prize draw

Anyone who buys the Photo Beach Teach DVD before 30th June 2010 will be entered into a prize draw to win a limited edition, signed copy of my favourite picture from the DVD. There are three prints up for grabs and the only way to get one is by being in the prize draw.


Don't worry if you've already bought a copy of Photo Beach Teach, you've already been entered. Good Luck.